Let's make a music teacher, part 4: Project structure, local modules, and a chatbot.
In this article we’re going to implement the music teacher, finally! This teacher will be a new program that uses a local module structure.
SwiftPM’s examples are plentiful when dealing with remote repositories, but working locally has its own challenges. We’ll dive into that. This article covers a lot of project and folder structure information and how to glue together different programs into one. All while maintaining a single repository.
Then we round up this article by implementing the teacher in the shape of a chatbot.

![]()
Are you new to this series? Check out the first article.
1 Defining the teacher program
Previously, we’ve made a program that models music and could output some chords, scales, and this thing called key signatures.
With the music program at its core, we can build a teacher. Finally!
Let’s start small. Again, I think a good starting point is to first pretend that something exists. This will be our north star, our guiding light, in knowing what to build. As opposed to “just starting” to program, and then think about requirements later. I have fallen into this trap too often.
By keeping the perspective of the customer or end-user in mind, we won’t get distracted by writing the cleverest code, build features we don’t need, or argue about whether or not to use if vs guard statements.
Instead, by looking at the requirements, we know the scope of our project, and we can focus on getting a job done. Everything else becomes secondary.
1.1 The teacher in action
For the teacher, I’d like to imagine something like the following on the command line:
The program asks a question, reads input, and continues on to the next question. In the case of faulty input or a wrong answer, the teacher will repeat the question.
% music-teacher start

Teacher: "What are the notes in the D chord?"
D, f sharp, and A

Teacher: "I don't understand that input."
Teacher: "You can type notes such as "Bb F#" or "f#""

Teacher: "What are the notes in the D chord?"
G D f#

Teacher: "Sorry, wrong answer!"

Teacher: "What are the notes in the D chord?"
D f# a

Teacher: "Correct!"

Teacher: "Next question."

Teacher: "What are the notes in the C minor chord?"
At this stage, the teacher runs forever, there are no “sessions”. That’s the benefit of a teacher program instead of a human, it never sleeps! That’s also a downside of a teacher program, it never sleeps!
Then in the future we can expand the teacher’s capabilities; Such as playing notes (actual audio) while referring to them in text. We could give it more personality by adding encouraging and corny messages such as “Worried about playing guitar? Don’t fret!”.
We can also build ear training exercises, which is the teacher playing a note and you have to tell which one it is. We can take it really far if we’d like, such as keeping track of progress, taking exams, making it a sentient AI, stuff like that.
But today, we focus on getting the basics working.
And in this article, before we make the teacher, we’ll take a detour to get our project and modules set up.
Then we’ll build the chatbot at the end.
2 Making a separate teacher program
In the example, you may have spotted that we don’t use the music command to run the teacher program. Instead we run music-teacher.
This means that we have a separate program. And that is because I am considering music-teacher its own program, and not part of our music program.
I like to think of the music code as something that models music. It knows about notes, scales and chords. Thinking about its “life purpose”, it could potentially support audio from multiple instruments, maybe rhythms, beats, or even generate sheet music.
Whereas the teacher takes a different direction: The teacher program is more like a chatbot. It knows about parsing and validating input, a hinting system, matching against answers, giving encouragement, maybe keep track of progress. The teacher “just so happens” to teach music. But technically, it could teach anything, really.
This is an important distinction: Our teacher knows about music, it’s a music-teacher. But the music part does not know about teaching!
In other words. Teacher depends on music.
Ask ten developers, and you get ten different approaches. But my intuition strongly tells me this is the way to go. I’d rather have a smaller music program and a smaller teacher program, than an intertwined program that does everything.
In my experience, a clear distinction means our code is more compartmentalized, which helps us and other developers to “fit” code in their heads a bit better.
![]()
If this feels like a big decision, not to worry, we’re just putting files in different folders, really.
2.1 Local or remote?
So how will we go about this? We have a couple of paths we can take:
- Option 1: We keep everything together locally. Both MusicTeacher and Music will live in a single repository.
- Option 2: We create a new repository for MusicTeacher. Two repositories in total, where MusicTeacher will depend on Music.
I prefer to take Option 1. Let me explain why.
2.2 The problem with remote modules for immature projects
Even with multiple modules, all our code will live in a single repo. This is to ensure that everything works together in harmony, yet we still get the benefit of a hard division between music and music-teacher, our code stays decoupled that way. This means that Music will be a local dependency for MusicTeacher. Once Music matures, we can choose to extract it and make it its own full-fledged module with CI, documentation, etc.
Alternatively, if you read the SwiftPM documentation, you’ll see some examples on how to work with multiple modules across multiple repos.
Depending on modules is fine in general. But for a new project, if you’re depending on new remote modules right away, you’ll quickly learn how cumbersome that is!
Taking this road, means that for a small program — like ours — you’ll end up with tiny little repos that you’ll have to maintain. In a company, you’ll have to set up CI and offer versioning / releasing strategies. You’d also have to keep committing code and push to branches before you can pull them into your own project. And don’t forget to first pull updates every time, otherwise you’re testing against an older version!
Oh wait, you did pull? Well tough luck, you forget to clear your Derived Data and you’re still testing against an older version, oops, time to rebuild.
Of course you can mitigate a lot by setting up the repo as a local dependency, but uh oh, now you better be sure not to accidentally commit the Package.swift file that’s pointing to your local drive.
What else? Oh no, that tiny repo you made is out there for everyone to see. Now your coworkers reach out to you via Slack “yo what is this 20 line code repo doing there without any documentation? Can we delete it?”. And you’d have to explain what’s going on, while all you wanted was just to write some code.
Long story short: Multiple remote repositories powered by SwiftPM sound nice on paper, but cause more ceremony, which is fine if code is more mature and shared. But it’s not practical at all for new and immature projects.
In the beginning, local modules are the way to go. This way, you know the modules play nice with each other.
Let the code marinate for a while. Once a module matures or if it needs to be reused, then you can extract it. In the beginning, keep it local.
Just my advice.
There is a main downside to this approach: Now Music, with all its scale knowledge, can’t be used by others because it will be part of the MusicTeacher program. This is a deliberate choice. At this stage, Music isn’t intended to be used by others yet, it needs to mature first. Call me crazy, but I don’t want to deal with people adding Github issues.
Let’s continue on how to work with local modules.
3 Making a plan
So how do we make a project structure with local dependencies? We start thinking about splitting code into modules.
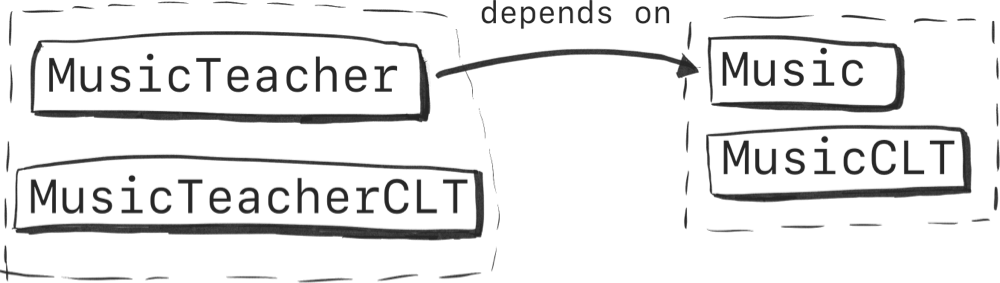
Currently, all we have is a music Command Line Tool. We’ll split music into a Music library and a Command Line Tool called MusicCLT.
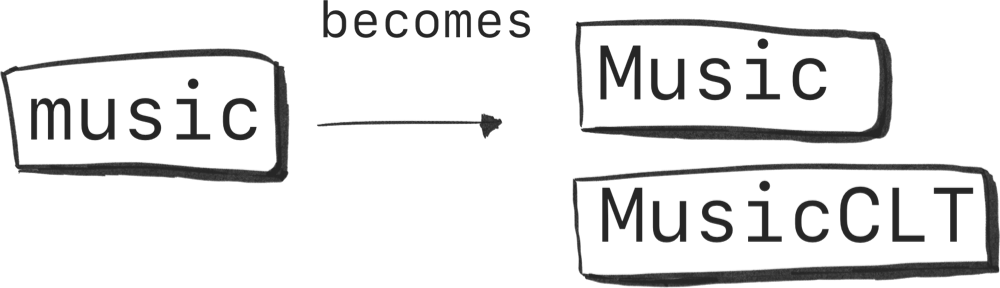
Then we’ll make a MusicTeacher which is a new project. It’s both a library (just in case we want to depend on it), and a Command Line Tool called MusicTeacherCLT that we can run.
Then the MusicTeacher library will depend on the Music library.
We end up with two projects, each with two targets.
Starting out, let’s take a look the current folder structure.
Here I used the tree command with -d flag to only show directories.
 % tree -d
.
├── Sources
│   └── music
└── Tests
    └── musicTests

4 directories
Notice how we have only music in here.
Once we are done, our repository will have two projects inside, Music and MusicTeacher. Our folder structure will look as follows. Notice how Music is now one directory deeper.
% tree -d
.
├── Music # The Music program moved a directory deeper
│   ├── Sources
│   │   ├── Music # Music library
│   │   └── MusicCLT # Music Command Line Tool
│   └── Tests
│       └── MusicTests
└── MusicTeacher # A second (new) program
    ├── Sources
    │   ├── MusicTeacher # MusicTeacher library
    │   └── MusicTeacherCLT # MusicTeacher Command Line Tool
    └── Tests
        └── MusicTeacherTests

12 directories
We’ll end up with two projects side-by-side.
![]()
See? Like I said, these may feel like big decisions, but we are really just moving files around.
3.1 Capitalization woes
![]()
Follow along! View the source on Github.
Before we begin, I want to address a side-problem. I use lowercase names for my projects on my disk. Such as music or swift-in-depth. Now this has bitten me. SwiftPM uses a local file structure as truth, and a lowercase folder leaks all the way through into our project.
By looking inside musicTests.swift you can already see the lowercase names tainting our project.
import XCTest
import class Foundation.Bundle
import music // Oh em gee, no capitalization

// uh oh, musicTests instead of MusicTests
final class musicTests: XCTestCase {
  // ... snip
}
This might be as annoying as reading “XCode” or “IOS”.
Let’s make it consistent for people importing our project by renaming any appearance of music to Music. So the music folder becomes Music. musicTests becomes MusicTests, the name of our package will change from "music" to "Music" etc.
Our Package.swift file will look as follows:
import PackageDescription

let package = Package(
    name: "Music", // renamed from "music"
    dependencies: [
        .package(url: "https://github.com/apple/swift-argument-parser", from: "1.0.0"),
    ],
    targets: [
        .executableTarget(
            name: "Music", // renamed from "music"
            dependencies: [
                .product(name: "ArgumentParser", package: "swift-argument-parser")
            ]),
        .testTarget(
            name: "MusicTests", // renamed from "musicTests"
            dependencies: ["Music"]), // depends on "Music" instead of "music"
    ]
)
But also class-names like musicTests will become MusicTests.
import Music // Using "Music" instead of "music"

final class MusicTests: XCTestCase { // used to be MusicTests
  // ... snip
}
After the renaming is done, our folder structure now looks follows.
% tree
.
├── Package.resolved
├── Package.swift
├── README.md
├── Sources
│   └── Music
│       ├── Array+rotate.swift
│       ├── Note.swift
│       └── main.swift
└── Tests
    └── MusicTests
        └── MusicTests.swift

4 directories, 7 files
Lesson learned, use capitalized folders when working with SwiftPM!
4 Extracting a Music module from our program
Now it’s time to split the Music Command Line Tool into a Command Line Tool and library.
Again, we can take two directions.
Option 1: We can leave the Command Line Tool as is and make a new library.
Option 2: We turn the Command Line Tool into a library, and make a new Command Line Tool.
Let’s choose choose option two, it’s less work. We mainly have to move the main function.
4.1 Making the folders
Inside the Sources folder, we’ll add a new folder called MusicCLT which will be the Command Line Tool, basically doing the argument-parser stuff and holding the main entry-points. Then we have the Music library which is the heart of our program and what the teacher and MusicCLT will use.
Notice how we’ll move main.swift to MusicCLT so it can run. But inside main.swift there is a lot of scale and chord knowledge, we need to keep that inside Music so we made a new file called Music.swift and moved some of that logic from main.swift there.
 % tree
.
├── Package.resolved
├── Package.swift
├── README.md
├── Sources
│   ├── Music
│   │   ├── Array+rotate.swift
│   │   ├── Note.swift
│   │   └── Music.swift # New file containing scales and chord logic
│   └── MusicCLT # New folder
│       └── main.swift # We moved main.swift here
└── Tests
    └── MusicTests
        └── MusicTests.swift

5 directories, 8 files
Now we have to update the tests.
Inside MusicTests.swift we change import Music to import MusicCLT.
The file main.swift now only contains some argument parsing logic.
![]()
Now Xcode might trip up a bit, mentioning things about missing packages even though they are there. I found that restarting Xcode helps solve a bunch of these problems.
4.2 Adding targets
Now let’s set up our targets so we can run things.
Looking inside Package.swift, we’ll make a couple of changes.
- Before, we had an executable target called
"Music". We’ll rename this to"MusicCLT"since that’s our executable program inside theMusicproject. - We make sure our tests use
"MusicCLT". Since the tests use the command line. - Then we’ll add a new target called
"Music", which will be our library. - Then we’ll make
"MusicCLT"depend on"Music".
Let’s look at Package.swift after all these changes:
// swift-tools-version:5.5
// The swift-tools-version declares the minimum version of Swift required to build this package.

import PackageDescription

let package = Package(
    name: "Music",
    dependencies: [
        .package(url: "https://github.com/apple/swift-argument-parser", from: "1.0.0"),
    ],
    targets: [
        .target(name: "Music"), // New target
        .executableTarget(
            name: "MusicCLT", // Music is renamed to MusicCLT
            dependencies: [
                "Music", // Newly added, MusicCLT depends on Music
                .product(name: "ArgumentParser", package: "swift-argument-parser")
            ]),
        .testTarget(
            name: "MusicTests",
            dependencies: ["MusicCLT"]), // Now depends on MusicCLT
    ]
)
4.3 Designing a public API
Almost there, our project is set up fine, and MusicCLT depends on Music. But, our code doesn’t compile yet, because Music doesn’t have any public types yet.
A naive approach would be to follow the compiler and add public for all the required places.
When extracting a module, it’s a good point to stop and think about API design. A strong public API goes a long way and avoids maintenance-headaches in the future. At this stage, breaking the public API is free, whereas later on it’s more painful; You’d have to deal with deprecations, breaking code, or angry developers who built their multi-billion empire using our code.
Looking at the code, we have a couple of global / free functions. Such as notesIn(scale:) or majorChord(for:). We can make them public, but then we’d have these functions live in the global namespace for whoever imports them. Right now it’s not a big deal, it’s only used by MusicCLT. But if we were to move the Music module out, then we’ll pollute more namespaces.
What I recommend is, as soon as you make a module, refine the public API for a bit to future-proof it. This will save yourself some headaches later. And we have nothing to lose if we do it at this stage, at worst it will take us a few minutes.
4.4 Faking a namespace
Let’s take our global functions and put them inside an enum. This will “namespace” them. We use an enum because an enum can not be instantiated.
Then we can make the enum and functions public (so that they can be accessed by MusicCLT and the teacher). We’ll also make them static since they are pure functions. Data in data out. We don’t have to keep state, or make instances from a class or struct, for example.
public enum Notes {

    public static func notesIn(scale: Scale) -> [Note] {
      // ... snip
    }

    public static func majorChordFor(note: Note) -> [Note] {
      // ... snip
    }

    public static func minorChordFor(note: Note) -> [Note] {
      // ... snip
    }

    public static func keySignature(note: Note) -> [Note] {
      // ... snip
    }

}
Now we can call methods such as Notes.majorChordFor(note:) or Notes.keySignature(note:). And becauses Notes is an enum, we can’t instantiate it by calling Notes().
That should be the only modification for now. For the rest we can follow the compiler and make things public where needed.
Then inside MusicCLT, we’ll be sure to import Music, and update the code to use the new static methods we just defined.
4.5 Updating tests
If we run our tests, they fail! It’s because our program isn’t "music", it’s "musicclt" now. Let’s adjust it accordingly.
final class MusicTests: XCTestCase {

  private func runWithArguments(args: String) throws -> String {
    // This...
    let path = productsDirectory.appendingPathComponent("music")
    // ... becomes
    let path = productsDirectory.appendingPathComponent("musicclt")


    // ... snip
  }
}
Great, it all runs and works.
5. Making room for the teacher
Next challenge, how do we support two local modules in a single repo?
I’ve tried a couple solutions, but SwiftPM really doesn’t like nested projects very much. I also don’t want to stick more and more targets onto Music, and remember, Music doesn’t know about MusicTeacher.
Instead, I decided to move Music to its own folder, then make a MusicTeacher folder next to it.
Instead of our project containing the files for the Music project, we’ll have it contain two folders. One for Music, one for MusicTeacher.
Like so (as discussed before):
.
├── Music
│   ├── Sources
│   │   ├── Music
│   │   └── MusicCLT
│   └── Tests
│       └── MusicTests
└── MusicTeacher
    ├── Sources
    │   ├── MusicTeacher
    │   └── MusicTeacherCLT
    └── Tests
        └── MusicTeacherTests
5.1 Making folders
First, we’ll make a Music dir. Then we move the contents into the Music folder. We’ll also make sure to move the hidden .swiftpm folder
If you want to use the terminal, you can use the mv command. We’ll exclude moving “Music” to “Music” by using *[^Music]* options. Be sure to leave the .gitignore and .git files as is, or we’ll move the entire repo, which is not what we want.
mkdir Music
mv *[^Music]* Music
mv .swiftpm Music
But it’s probably easier to drag using finder. Be sure to keep the hidden files in mind!
![]()
Tip: In Finder, you can press CMD + Shift + . and hidden files will appear or disappear.
5.2 Adding a MusicTeacher project
Now we can add the MusicTeacher project.
Let’s begin by making a new project:
We make a new MusicTeacher dir and cd (change directory) into it. We use $_ to move directly to the newly made directory.
mkdir MusicTeacher && cd $_Then we’ll initialize it.
swift package init --type executableNotice how I used a capitalized name this time? I don’t want to rename everything again!
![]()
We are not going to go over all the bootstrapping parts again. You can learn more about bootstrapping a project in the first article.
5.3 Multiple targets again
Maybe as a preparation, we can already make MusicTeacher both a library and a Command Line Tool. Just like Music! Perhaps we can then make a SwiftUI app out of MusicTeacher, for example.
We won’t cover the same steps again here. It’s the same as Music.
Let’s look at our current structure. Notice how we have two projects, Music and MusicTeacher. And each has two targets, a library and a Command Line Tool.
.
├── Music
│   ├── Package.resolved
│   ├── Package.swift
│   ├── README.md
│   ├── Sources
│   │   ├── Music # Music has a library called Music...
│   │   │   ├── Array+rotate.swift
│   │   │   ├── Music.swift
│   │   │   └── Note.swift
│   │   └── MusicCLT # ... and a Command Line Tool
│   │       └── main.swift
│   └── Tests
│       └── MusicTests
│           └── MusicTests.swift
└── MusicTeacher
    ├── Package.swift
    ├── README.md
    ├── Sources
    │   ├── MusicTeacher # MusicTeacher has an empty library...
    │   └── MusicTeacherCLT # ... and a Command Line Tool
    │       └── main.swift
    └── Tests
        └── MusicTeacherTests
            └── MusicTeacherTests.swift
5.4 Depending on Music
Now, MusicTeacher will depend on Music so it can use its code.
Music consists of two targets, a local target and an executable one. But to use Music outside of its own scope, it needs to be a library as well.
Let’s add the following lines to its Package.swift.
    products: [
        .library(name: "Music", targets: ["Music"])
    ],
Then inside The MusicTeacher’s Package.swift, we depend on "Music".
// swift-tools-version:5.5
// The swift-tools-version declares the minimum version of Swift required to build this package.

import PackageDescription

let package = Package(
    name: "MusicTeacher",
    dependencies: [
        .package(name: "Music", path: "../Music") // New dependency
    ],
    targets: [
        // We depend on Music
        .target(name: "MusicTeacher", dependencies: ["Music"]),
        .executableTarget(
            name: "MusicTeacherCLT",
            dependencies: ["MusicTeacher"]),
        .testTarget(
            name: "MusicTeacherTests",
            dependencies: ["MusicTeacherCLT"]),
    ]
)
MusicTeacher/Package.swift
Whew, we are done with project structure! Congrats for making it this far.
It may feel like a lot of work to set up the modules. But in reality it should only take a few minutes. Basically we are moving some files and folders around.
I recommend you try it yourself to get a feel for the work it takes. You can grab the code from the third step, used in the previous article and follow the steps above to end up where we are now.
6 Implementing MusicTeacher
With all modules in place, on to the fun stuff: Implementing the MusicTeacher program.
Let’s look again at how we’d like it to behave.
% music-teacher start

Teacher: "What are the notes in the D chord?"
D, f sharp, and A

Teacher: "I don't understand that input."
Teacher: "You can type notes such as "Bb F#" or "f#""

Teacher: "What are the notes in the D chord?"
G D f#

Teacher: "Sorry, wrong answer!"

Teacher: "What are the notes in the D chord?"
D f# a

Teacher: "Correct!"

Teacher: "Next question."

Teacher: "What are the notes in the C minor chord?"
It doesn’t have to be 100% the same, but this is a good direction to go.
If we look at it, it has a prompt (question), and an expected answer. If the input is wrong, it will let you know. If the input is right, but the answer is wrong, it will say something else.
Only once the answer is correct, the teacher will continue to the next question.
Let’s build it!
6.1 The MusicTeacher program.
Inside the MusicTeacher library we’ll define a Prompt. Which is a question with an expected answer.
We’ll make Prompt conform to CustomStringConvertible so we can print it directly to show the question.
import Music  // We depend on the Music library
import Foundation

/// A `Prompt` represents a question and expected answer.
struct Prompt: CustomStringConvertible {
    let question: String
    let expectedAnswer: [Note]

    var description: String {
        question
    }
}
Then we add a factory function that will give us new prompts, using a random note to build chords off of.
/// Generate a random Prompt
func makePrompt() -> Prompt {
    guard let note = Note.naturals.randomElement() else {
        fatalError("Could not retrieve note")
    }

    let expectedAnswer = Notes.majorChordFor(note: note)
    return Prompt(question: "Teacher: \"What are the notes in the \(note) chord?\"",
                  expectedAnswer: expectedAnswer)
}
Then we make a MusicTeacher class to run our program loop. It’s a while loop that gets halted by readLine(), which expects user input. Once we input something, we retrieve a value. Then the loop continues and repeats.
After receiving value, we try to parse it to notes. [Note] to be exact. Then we compare it against the expected answer. If the answer is correct, we make a new prompt. If the answer or input is wrong, we print a message and repeat the current prompt.
/// A Music Teacher that will prompt for questions
public final class MusicTeacher {

    public init() {}

    /// Start a Music Teacher, will print to console.
    public func start() {
        var currentPrompt: Prompt = makePrompt()
        print("Teacher: \"Let's begin\"")
        while true {
            print(currentPrompt) // We print the current question (prompt)
            guard let value = readLine() else { // We read the input
                continue
            }

            // We parse the input
            let notes = value
                .components(separatedBy: " ")
                .compactMap(Note.init)

            // If the answer is correct, get a new prompt.
            if notes == currentPrompt.expectedAnswer {
                print("Teacher: \"Correct!\"")
                print("")
                print("Teacher: \"Next question:\"")
                currentPrompt = makePrompt()
            } else { // If the answer is wrong...
                if notes.count == 3 { // Notes are parsed, but answer is wrong.
                    print("Teacher: \"Sorry wrong answer!\"")
                } else { // Input couldn't be parsed.
                    print("Teacher: \"I don't understand that input!\"")
                    print("Teacher: \"You can write answers with spaces between the notes\"")
                    print("Teacher: \"For example: C D# fb\"")
                }
            }
            print("") // Printing a new line.
        }
    }

}![]()
We make MusicTeacher public so that we can use it from MusicTeacherCLT.
And it’s final because we don’t need it to be subclassed. It’s a good default.
Then inside MusicTeacherCLT’s main.swift file, all we have is:
import MusicTeacher
import Foundation

let teacher = MusicTeacher()
teacher.start()
The program is tiny for now. At this stage I have not yet implemented the code to make it work on the command line using ArgumentParser. This program runs from inside Xcode.
6.2 Let’s give MusicTeacher a test-run.
Alright, let’s try out our teacher-chatbot!
Teacher: "Let's begin"
Teacher: "What are the notes in the G chord?"
GAB
Teacher: "I don't understand that input!"
Teacher: "You can write answers with spaces between the notes"
Teacher: "For example: C D# fb"

Teacher: "What are the notes in the G chord?"
G A B
Teacher: "Sorry wrong answer!"

Teacher: "What are the notes in the G chord?"
G B D

Teacher: "Correct!"

Teacher: "What are the notes in the D chord?"
D F# A

Teacher: "Correct!"

Teacher: "Next question:"

Teacher: "What are the notes in the G chord?"
Okay great, it works. We have a rudimentary music teacher now! It only took us four articles 😉.
It detects correct input, incorrect input, and unsupported input. We can already see it will repeat questions. Notice how it asked for the G chord’s notes twice. Currently our teacher isn’t very smart, it just loops over chords, and it doesn’t keep track of what you already know, which is something to improve in the future.
There are many things to improve really. We haven’t yet added argument parsing using the ArgumentParser, for instance.
Another thing I noticed right away, is that when the teacher writes out messages they are printed instantly. It doesn’t feel “human”. So once you give wrong input, it will print four lines at once. Which is a lot at once. It might be nice to add some fake delays.
That’s what I like about iterative development, try to get something running quickly, then you can learn things you didn’t foresee. I didn’t, for example, expect to be bothered by the multiple print statements until I experienced it.
We do have a solid base to work from though.
Want to learn more?
From the author of Swift in Depth
Buy the Mobile System Design Book.
Learn about:
- Passing system design interviews
- Large app architectures
- Delivering reusable components
- How to avoid overengineering
- Dependency injection without fancy frameworks
- Saving time by delivering features faster
- And much more!
Suited for mobile engineers of all mobile platforms.
Conclusion
We did a lot of work! We went from a single project to a multi-project in a single repo. All our files and modules are in place. If it feels like a lot, remember, if you follow along you’ll quickly realize we are just moving some files around and updating Package.swift files.
The benefit is that with a single repo, we get to work really fast. Then once Music matures, we can extract it to a public library for others to use, if we so please.
We’ve also seen how to create a rudimentary chatbot. It may not look like much, but I already like how I could use it to train me on my chord knowledge.
Next, we can think about improving things. We can make the chatbot smarter, or expand on its features, such as making it ask more types of questions, or incorporate sound-files, or keep track of what we know. We can also go a different direction, such as using our code in a new target, such as a SwiftUI iOS app.
There are many directions we can take!
I hope this was helpful to show you how you can organize your projects. And I hope to see you next time.
Written by
Tjeerd in 't Veen has a background in product development inside startups, agencies, and enterprises. His roles included being a staff engineer at Twitter 1.0 and iOS Tech Lead at ING Bank.