Let's make a music teacher, part I: Bootstrapping with ArgumentParser
In this article we are going to make a new program that helps people learn music theory. You’ll learn how to bootstrap a Command Line Tool, make a small program, and you’ll learn some music theory along the way.

What are we making?
We’ll make a program to help people learn music theory. A music teacher program can be many things, ranging from giving simple pre-programmed questions and answers, all the way to a self-aware powerful AI entity with world-domination tendencies, yet decides to quiz you on music.
But at this stage, we will start by making a small command line tool that we can use to get musical information, such as asking which notes are in a C major scale or what a C chord is made out of. Then we can go from there to build something more sophisticated.
“Why a music program? I’d rather make a todo app”
Because it’s a fun exercise with a lot of room to grow and experiment. We could potentially turn this simple command line tool into an app with UI for flashcards (to teach via spaced repetition), or figure out a way to generate sheet music, or maybe we’ll make an app that has you name all the notes on a guitar. Or maybe we’ll keep it a command line tool that will play notes and chords.
Also, music theory has some interesting properties to model, such as multiple names for the same things, and lots of cyclical ideas.
Either way, a wide range of topics and possibilities are fun to explore with Swift programming.
And with a bit of luck, not only will you strengthen your Swift skills, but you may even learn a thing or two about music! (Assuming you’re not already an experienced bedroom guitarist).
Bootstrapping a Command Line Tool
First, we need to bootstrap a new project. It’s quite boilerplate-y so let’s get it out of the way quickly.
Please follow along to train your muscle memory. Open the terminal, navigate to a folder of your liking. Then enter the following commands to make a directory that we aptly called music, in which we’ll generate a new project.
![]()
For readability, the % symbol represents the command line prompt, and you don’t have to type it.
% mkdir music && cd music
% swift package init --type executable
This way we end up with an example project powered by the Swift Package Manager.
If you want to know more about creating a new project, type swift package init --help.
% swift package init -help
OVERVIEW: Initialize a new package

USAGE: swift package init <options>

OPTIONS:
  --type <type>           Package type: empty | library | executable | system-module | manifest (default: library)
  --name <name>           Provide custom package name
--version Show the version.![]()
The executable flag makes sure we’re building a command line tool, as opposed to, say, a library (which is the default).
Let’s give it a little test-run, we’ll build and run the project using the swift run command.
% swift run
Hello, world!
We can also choose to build without running, using the build command.
% swift buildWe need the build command if we want to ship a binary file, or if we want to check if things compile in the first place.
But where does that build to? Let’s find out, using swift build -h we know that we can use the --show-bin-path option.
% swift build --show-bin-pathOn my machine it points to .build/x86_64-apple-macosx/debug, on yours it may differ.
This means you can also point to the binary to run it.
% .build/debug/music
Hello, world!
Hooray it works!
Great, so far so good.
A tiny Music Theory crash course
Since we are making a music program that teaches music theory, it would be quite helpful for us to know how music theory works — at least to a small extent. I think now is a good time to learn a few basics of music. No worries, we’ll keep it short, and right after that we’re going to do some programming.
![]()
Already comfortable with music theory? Feel free to skip to the next section.
We need notes to make music. As you probably know, a note is essentially a sound, caused by vibration. A slower vibration means lower pitch, and vice versa.
We’ll use the keys of a tiny piano, because it’s easier to visualize notes. (Even if you prefer heavy metal shredding on a guitar, and I won’t blame you).
If you move over to the next key on a piano, you move a half step (also known as semitone). Even when you move from black to white keys or vice versa, it’s a half step.
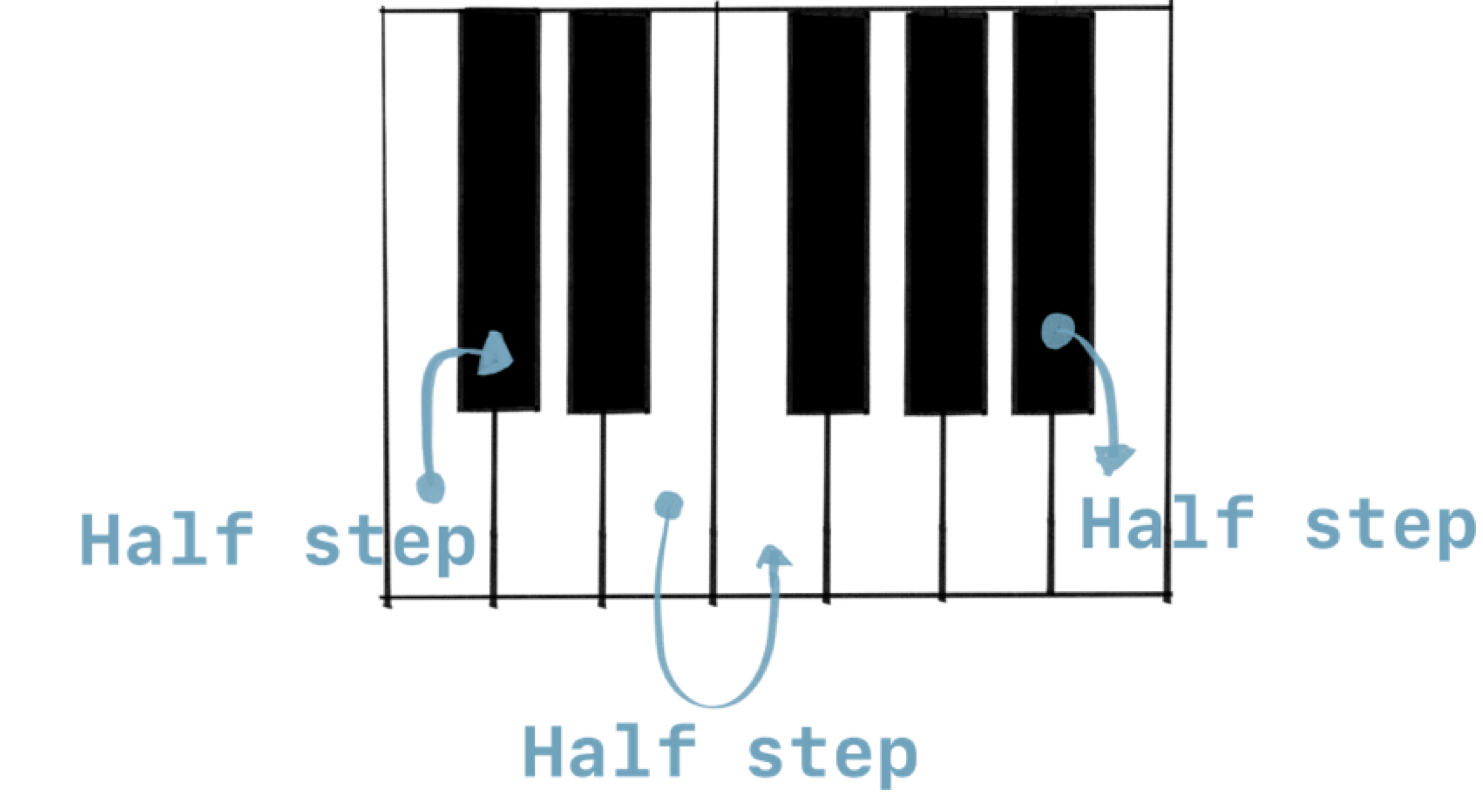
The distance between two keys is called a whole step (also called tone).

Naming the notes
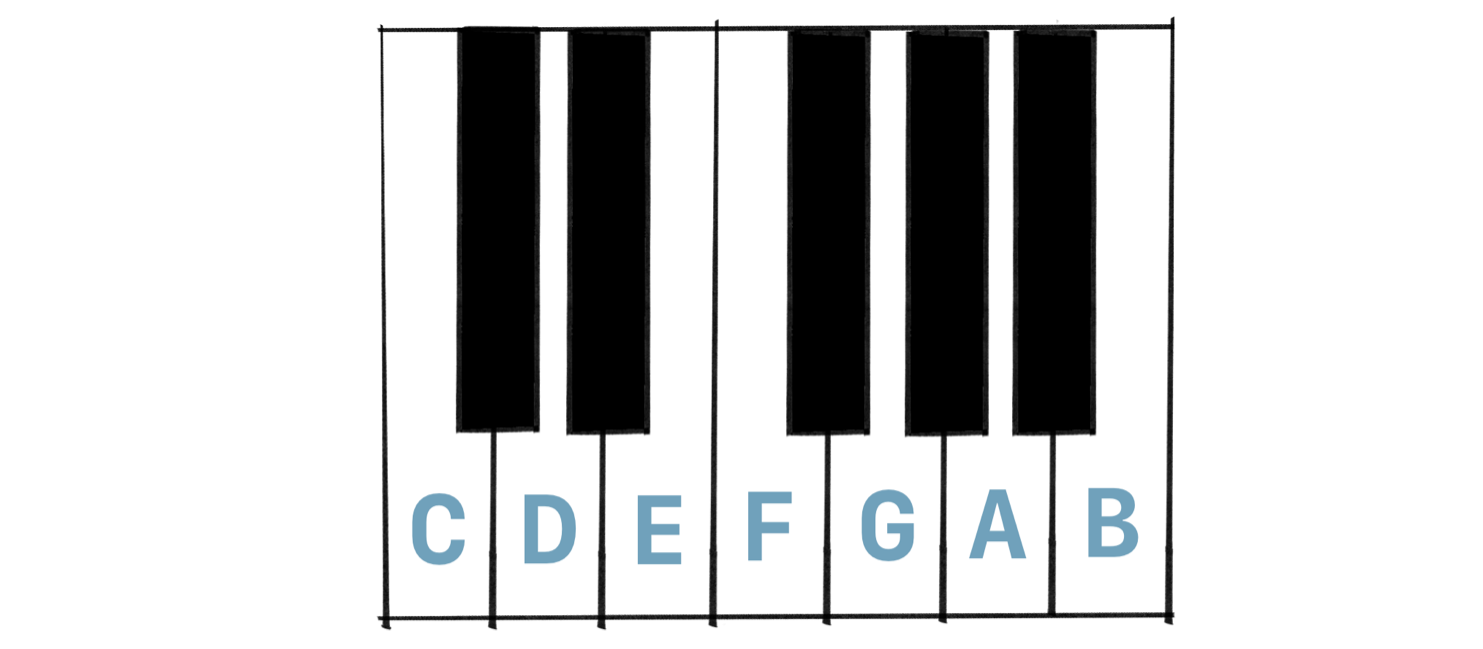
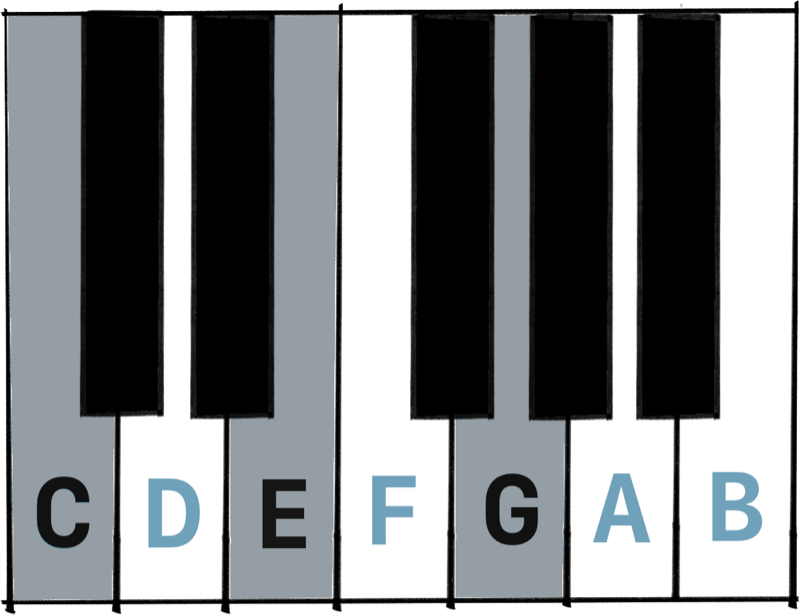
A long time ago, someone decided, “Hey, let’s give these notes some names”. And the notes were called A B C D E F G.
The white keys match these names. The black keys represent accidentals which we’ll cover in a follow-up article.
![]()
The image starts at C, which helps us explain scales in a moment.
There’s a pattern to how the keys are laid out. Move over eight white keys, and we have the same pattern again, except now it’s double the frequency, which is what we call an octave (oct meaning eight).
Let’s enlarge the piano.
For example, if we move from C to C, we have an octave.
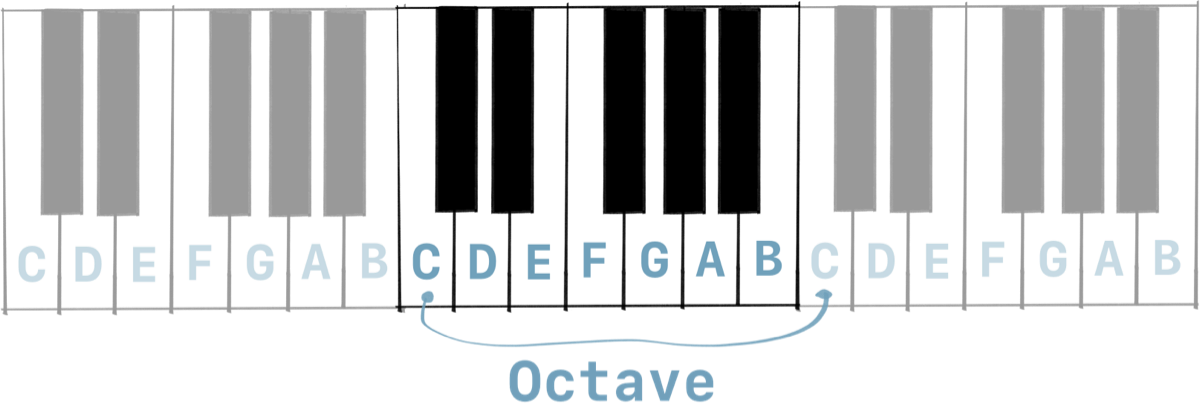
If we’re listening to a note that’s an octave higher, it doesn’t sound like a new note. Us humans are really good at interpreting double the frequency (octave) as the same note “This C note sounds like the other C, but with a higher pitch!”.
After G, we start over at A. There is no H note after G, so we are back at an A.
Major scale
Now that we know steps and notes, we can talk about scales. We need to understand scales to be able to model chords and many other things.
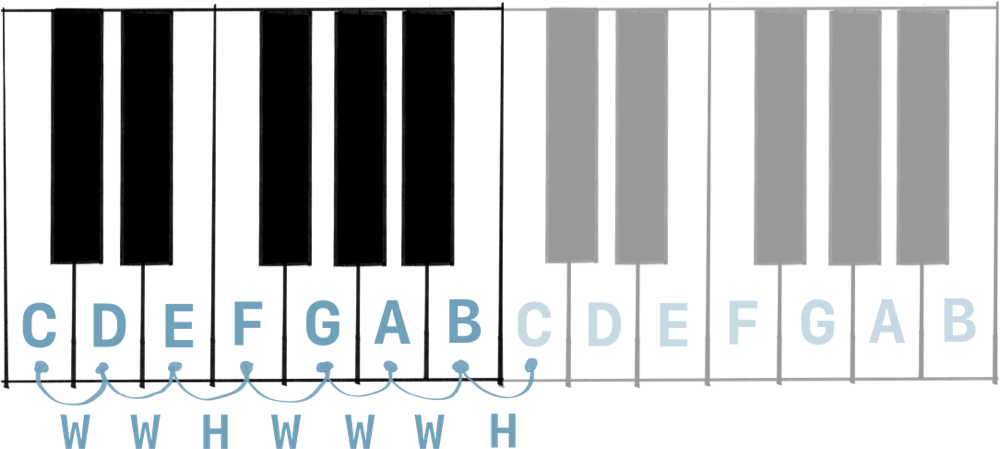
A scale is a pattern of whole steps and half steps.
If we take the major scale, that pattern is: Whole step, Whole step, Half step, Whole step, Whole step, Whole step, Half step.
We can denote this pattern as W W H W W W H and pronounce it as “Whole whole half, whole whole whole half”.
Looking at the keys, starting from the C: If we play the notes following this pattern, we play the C major scale C D E F G A B back to C.
Notice how we don’t need to use any black keys (accidentals) for the C major scale.
If we started from a different note, such as D, and played the same pattern, we’d play the D major scale — although that requires black keys (accidentals) which we’ll cover later.
Major chord
And the last piece we need to know today is how a major chord is defined.
A chord is a basically a bunch of notes played at the same time, and a major chord is made by combining the 1st, 3rd, and 5th note in a major scale.
![]()
Starting to count at 0 is maybe normal for us, but really weird to non-programmers. So in music we start counting at 1.
Starting at C, play a note (1st), skip a note, play a note (3rd), skip a note, play a note (5th). That’s our major chord.
Applying this pattern to the C major scale, we get the C E G notes. Congratulations, you figured out the C major chord!
Okay, that wasn’t so bad was it? Now we know notes, the major scale pattern, and how to make a major chord, all within the scale of C.
Let’s start developing.
Starting development
We’ll open the folder in Xcode (e.g. drag it on Xcode), or by typing the xed . command.
% xed .This will open the project in Xcode.
Where should we start?
Designing the public interface
One technique is to think of our software from the perspective of our end user. To a user, the public interface (in this case the commands) of our program is most important. With that in mind, we’ll decide to model top-down first, starting from the public interface, after which we’ll implement the details.
Starting by designing the public interface works well for a couple reasons:
First, by defining a clear public interface, we have a better idea of the end-goal, which helps us prioritize. As opposed to “just starting” and worrying about the interface later. Because if we dived into coding without aim, we may get lost in data modeling and trying to make our code look as nice as possible. In other words, we risk nerd sniping ourselves a little.
Instead, let’s focus on making sure we deliver. And what we’re delivering is a tool with defined commands. Then once we got that working, we can always return and make our program look nicer, code-wise.
Second, by defining a clear public interface, we have a plan of what to test. Because testing the public interface is an important part to making sure our code remains stable, and it will give us the confidence to fearlessly refactor.
Deciding which commands we’ll support
We know about notes, the major scale pattern, the C major scale, and the C major chord. Let’s make our program able to give us that information.
We can ask for the scale pattern (defaults to major scale, which we just covered). We can use both --scale or -s as options.
% music --scale
W W H W W W H

% music -s
W W H W W W H
We can ask for the notes of C in the major scale, by passing c as an argument to the scale command.
% music --scale c
C D E F G A B

% music -s c
C D E F G A B
Lastly, we can ask for the notes in a major chord by only passing the chord (e.g. c). Again, we are only supporting the C major chord for simplicity.
% music c
C E G
It’s a tiny interface, but enough to get started.
Adding Apple’s ArgumentParser
First let’s get our dependencies in order. We’ll depend on ArgumentParser to help us, you guessed it, parse the arguments. We’ll update the package.swift file to reflect this. Once we’ll build our project, it will automagically get fetched and built into our program.
Package.swift
// swift-tools-version:5.5
// The swift-tools-version declares the minimum version of Swift required to build this package.

import PackageDescription

let package = Package(
    name: "music",
    dependencies: [
        .package(url: "https://github.com/apple/swift-argument-parser", from: "1.0.0"),
    ],
    targets: [
        .executableTarget(
            name: "music",
            dependencies: [
                .product(name: "ArgumentParser", package: "swift-argument-parser")
            ]),
        .testTarget(
            name: "musicTests",
            dependencies: ["music"]),
    ]
)
![]()
On the official Swift blog you can learn about ArgumentParser’s introduction and how to use it in more detail.
Implementing the program
Now that our requirements are clear. Let’s start implementing the program.
First we’ll make a struct, called Music, conforming to ParsableCommand. This protocol is available after importing ArgumentParser.
Then we define the values we wanted to pass to the command line, which are scale and note (optional) .
import ArgumentParser

/// The main entrypoint in the application
struct Music: ParsableCommand {

    var scale = false

    var note: String?

    // ... snip
}
Then we decorate the properties with property wrappers from the ArgumentParser. This will bind the passed values from the command line to these properties.
Notice how we’ll decorate the scale property with @Flag. @Flag is a convention for boolean values in command line tools. This will allow us to pass a value in such with --scale.
Then we have the note property which is an optional value of type String?. Since this note can be multiple things, depending on the context (a scale, or a chord), we won’t give it a fixed name just yet like --chord. Instead, we’ll make it an @Argument so that we can pass it unnamed.
We’ll also add help-texts to the property wrappers, which will generate a help-text for us, as we’ll see shortly.
And lastly, we add the .shortAndLong name to the @Flag property wrapper, so that we can use long and short notations such as --scale or -s.
import ArgumentParser

struct Music: ParsableCommand {

    @Flag(name: .shortAndLong, help: "List the scale pattern, or pass it a note for its major scale.")
    var scale = false

    @Argument(help: "A note or chord")
    var note: String?

    // ... snip
}![]()
As an alternative to @Flag you can use @Option. Confusingly, @Option doesn’t mean optional, it’s like @Flag but for string values (amongst other things).
As a finishing touch, we’ll add a little abstract so it will appear in the help-text. We do this by setting a static configuration.
struct Music: ParsableCommand {

    static var configuration = CommandConfiguration(abstract: "Helping you understand music theory.")
    // ... snip

}
Writing the logic
Now it’s time to implement the logic. Honestly, since we support so few commands, the implementation is quite trivial. The requirements aren’t that exciting yet, so let’s not pretend our code is. Let’s get the job done as simply as possible.
Inside the Music struct, the run() method is the one that will be triggered. Inside the run() method we switch over the scale and notes, and return the values accordingly.
If the command or note isn’t supported, we print a message (we’ll handle errors a later time, because we are just getting started). If the command isn’t recognized, ArgumentParser will print a usage message for us. If no command is sent at all, we print the help message using the helpMessage() property.
Below is the entire program.
import ArgumentParser

struct Music: ParsableCommand {

    static var configuration = CommandConfiguration(abstract: "Helping you understand music theory.")

    @Flag(name: .shortAndLong, help: "List the scale pattern, or pass it a note for its major scale.")
    var scale = false

    @Argument(help: "A note or chord")
    var note: String?

    mutating func run() throws {
        switch (scale, note) {
        case (true, let note?) where note == "c":
            // If we have a scale and c note.
            print("C D E F G A B")
        case (true, let note?):
            // Unsupported scale
            print("Scale of \(note) is not supported")
        case (true, nil):
            // If we have a scale and no note.
            print("W W H W W W H")
        case (_, let note?) where note == "c":
            // If we only have a c note
            print("C E G")
        case (_, let note?):
            // If we only have any note other than c
            print("Note \(note) is not supported")
        default:
            // If we have no command at all, print the help-message.
            print(Music.helpMessage())
            break
        }
    }
}

Music.main()![]()
We use Music.main() to automatically run our program.
The implementation won’t scale — pun intended — but that doesn’t matter at this stage.
Building and running
That was some light programming. It’s time to test our program.
We get a free help description, thanks to ArgumentParser. And it uses the help text we added to the property wrappers.
% swift run music --help
OVERVIEW: Helping you understand music theory.

USAGE: music [--scale] [--note <note>]

OPTIONS:
  -s, --scale             List the scale.
  -n, --note <note>       A note
  -h, --help              Show help information.
We can build and run our program as such:
% swift run music <arguments>Let’s give it a test-run, shall we?
% swift run music c
C E G

% swift run music d
Note d is not supported

% swift run music --scale
W W H W W W H

% swift run music --scale c
C D E F G A B

% swift run music --scale g
Scale of g is not supported

% swift run music --blast-metallica-over-speakers-at-neighbors-house
Error: Unknown option '--blast-metallica-over-speakers-at-neighbors-house'
Usage: music [--scale] [<note>]
  See 'music --help' for more information.

% swift run music
OVERVIEW: Helping you understand music theory.

USAGE: music [--scale] [<note>]

ARGUMENTS:
  <note>                  A note or chord

OPTIONS:
  -s, --scale             List the scale.
-h, --help Show help information.![]()
Notice how we use the swift run music command to specify which program it should run with the values we pass. If we were to omit "music”, such as swift run -scale, then -scale would be passed to the swift run program, not our program.
Great, it works as expected. We can ask for the C scale and chords, and the steps of the major scale. Admittedly our tool does not offer a lot of value yet. But we’ll mature it in a follow-up.
Making a release
As a bridge to the end, we can make a release-build using the --configuration release option.
% swift build -configuration release(Or you can use -c for the short notation).
Using the mv command, we move the freshly built binary to our /usr/local/bin folder (on Mac), so that we can run it from anywhere on our machine.
% sudo mv .build/release/music /usr/local/bin/Let’s try it out. If we navigate to any dir in the terminal, we can run the music command.
For example, below we’ll navigate to our home folder using cd ~, run the tool with music --scale, and then return to the original folder with cd -. We check the current paths with pwd, notice how we can run our tool from anywhere.
% pwd
/Users/tjeerdintveen/workspace/swift-in-depth/music

% cd ~
% pwd
/Users/tjeerdintveen

% music --scale
W W H W W W H

% cd -
~/workspace/swift-in-depth/music

% pwd
/Users/tjeerdintveen/workspace/swift-in-depth/music
Want to learn more?
From the author of Swift in Depth
Buy the Mobile System Design Book.
Learn about:
- Passing system design interviews
- Large app architectures
- Delivering reusable components
- How to avoid overengineering
- Dependency injection without fancy frameworks
- Saving time by delivering features faster
- And much more!
Suited for mobile engineers of all mobile platforms.

Conclusion
We’ve seen how to bootstrap a Command Line Tool. And we’ve started to make a program that can handle command line arguments using ArgumentParser. This is a solid way to get started and make your own command line tools using Swift. Then we’ve seen how to release our tiny program as well.
Meanwhile we also covered some music theory! In a follow-up lesson we’re going to make sure that our program is more robust, and we’ll make sure to offer more value to help people learn music theory. We’ll be sure to support all notes, major scales, and major chords. This also means we’re going to throw more complexity (and music theory) at our program and try to handle that, while keeping the code-base as simple and robust as possible.
Now that we got some boilerplate out of the way, we have a good starting point to work from.
See you next time!
Written by
Tjeerd in 't Veen has a background in product development inside startups, agencies, and enterprises. His roles included being a staff engineer at Twitter 1.0 and iOS Tech Lead at ING Bank.